


Our Favourite Quick & Simple Halloween Crafts
Halloween is the perfect opportunity for quick, fun craft projects. Whether you’re decorating your doorstep for trick or treaters or planning a themed table setting for guests, we have some ghoulishly great ideas to add extra enchantment to your evening! Also, if you have some little monsters at home who are keen to get stuck in, we have included some easy craft ideas to suit makers of all ages.
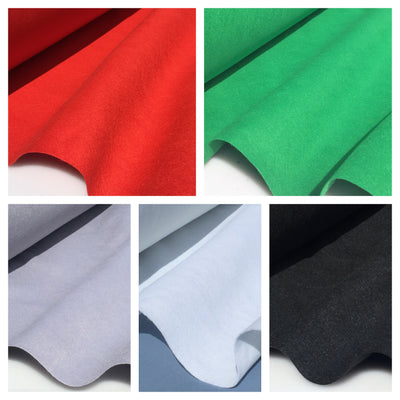
Glitter Felt Bat Garland
A very simple & low-cost project that’s high on impact, this glitter felt bat garland could not be easier to make! It is ideal for decorating a little one’s bedroom, the front of your home or adding to a mantlepiece display. All you need is a bat template, some black glitter felt (or you can add some orange to mix and match a classic Halloween colour palette) and some sturdy string or cord.
Start by drawing or downloading a hanging bat silhouette with open wings, ensuring the size of the template is in proportion to the planned length of your garland. Trace the bat silhouette onto the back of your black glitter felt and carefully cut out each bat. Next, make a small hole in the feet of each bat, so that you can thread your bats onto your garland string. You want to ensure the hole fits the string snuggly so the bats don’t move once you tape your garland in place. Once all of your bats are in place, all that remains is to position your garland and let your glam, glitter bats hang out ready for Halloween!

Pom Pom Pumpkins
With a little imagination, pumpkin decoration can go far beyond classic lanterns with scary faces. This is a great project for young as well as experienced crafters – and can be tailored to your Halloween theme and colour palette. Pom Pom pumpkins can be used to decorate your doorstep or dress a fireplace, ready to impress your guests.
Start by painting your pumpkin - you can use one solid colour, stripes or zig-zag patterns – and how about adding a touch of sparkle with a metallic painted stalk too! Next, make your pom poms using our small pom pom maker together with a selection of yarns to match your colour theme. To finish, simply glue your pom poms in rows from stalk to base, patterns or diagonals to complete your pumpkin! Don’t forget, your pom poms can be repurposed for a Christmas wreath and many other future craft projects after Halloween!
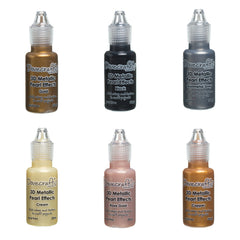
Metallic Pumpkin Wreath
Your doorstep will look seasonally well dressed for guests and trick or treaters, with this elegant metallic wreath. Start by sourcing some small, artificial pumpkins and a wire wreath frame. Then use our metallic pearl effects glue to paint and decorate each pumpkin. You can mix and match your pumpkins with solid colours and patterns, and our metallic glues have a fine nozzle to help with intricate designs. Once your pumpkins are painted and dried, carefully glue onto the wire frame and hang onto your door – your wreath will be ready to charm all ghoulish guests!
Splatter Paint Treat Bags
This is a great project to prepare little ones for trick or treating and with just enough messiness to make it fun!
Start with some simple, muslin drawstring bags. These can be easily made by following a quick online tutorial. Begin with a rectangular piece of muslin, folded with seams sewn on either side. To add the drawstring, fold over the open tops and add a seam along the edge of each folded side. Turn the pocket of muslin to the right side out and loop a piece of ribbon through one side, then the opposite side and secure the ends with a neat knot. Repeat on the opposite side, so the drawstring can be pulled at both ends.
Once your muslin bags are ready, now it's time to get creative! Use a stiff craft brush or an old toothbrush along with a selection of our fabric paints. Dip the brush in each colour, then either lightly stipple or flick the brush to splatter your paint. You can add glitter or metallic glues, on top of your colours to create a layered, splattered effect. Now your mini makers are ready to trick or treat in style!!
Macrame Ghosts
These enchanting wall hangings are great for decorating kids bedrooms, windows or any party space. Start by painting two or three embroidery hoops with black paint - our jute wreath frame would be ideal for this. Next cut about 14 pieces of macrame cord about 120 cm long for each hoop. These pieces will be knotted at the top of your hoop to hang down, creating your ghostly macrame characters. Use a Lark’s head knot to secure the cord to the hoop by holding 2 pieces of cord together, folding in half and wrapping the folded half around the embroidery hoop. Pull all 4 ends through the loop and pull tightly to secure the knot. Repeat with the remaining pieces of cord around the top of the hoop. To finish, cut two oval eyes and an oval mouth shape from black felt to make the ghoul’s face. Position the felt in the centre of the hoop and glue to the macrame cord. Your creepy, crafty macrame ghosts are ready to hang & haunt for Halloween!
Pom Pom Spider Balloons
This is a fantastic idea for a table centrepiece or to decorate a room for a Halloween party. You need a selection of helium balloons in orange and black, black ribbon, black pipe cleaners, black pom poms and some googly eyes.
Start by making the bodies of your spiders using our medium pom pom kits and some black yarn. Once you have your black pom poms, transform them into spiders by sewing 3 black pipe cleaners to the centre of each pom pom, making 6 legs and sticking googly eyes to each spider’s ‘body’ - you can add 3, 4 or more eyes to each spider to make them truly terrifying! Once your spiders are complete, tie each one to the end of a piece of ribbon and attach a helium balloon at the other end. These cute critters can sit as a table centrepiece or decorate your living room, ready to creep up on your guests!

Easy Front Door Banner
If you are looking for a quick way to dress your doorstep for Halloween, this front door banner is the perfect project!
Take a half metre strip of black cotton poplin fabric and cut a tapered, triangular point at one end. Fold over a 3-4 cm strip at the other end of the fabric and secure with iron-on tape, allowing a small gap for cord or a dowel rod to pass through. Now, it's time to add your Halloween message! A simple word like “Boo!” is ideal and will look very striking. Print out your word to the right size, then place freezer paper with the shiny side down over the printed letters. Trace the letters through the paper and cut out carefully using a craft knife. Position the freezer paper stencil in the centre of your banner and iron onto your fabric. Next, use our white fabric paint to neatly paint your Halloween message on to your banner and remove the paper once dried. To finish, thread some cord or a piece of dowel through the flap at the top – your Halloween banner is ready to dress your door!
Spider Web Tablecloth
A perfect project if you’re entertaining over Halloween, and it can also double as a wall hanging or front door banner.
Start by laying some plastic sheeting to project the surface you’ll be working on. Take a piece of plain black cotton poplin that will cover your table, that has been pre-washed and dried ready to use. As this project uses household bleach, ensure you are working in a well ventilated space and that your hands and clothes are protected. Use a fabric marker to draw large scale spider webs across the fabric, you can use a long ruler to help, vary the size of the webs and join the webs together with single lines to fill the fabric. Soak a craft brush in bleach and starting in the centre of your design, carefully apply the bleach along the lines of your webs. Once completed, let the fabric sit until the lines have all appeared, then rinse thoroughly and wash your fabric. Your spooky spider tablecloth is ready to delight your guests!
Spider Web Window Clings
This is a great project for little Halloween helpers and these webs can cling to windows or decorate a Halloween table.
Start by drawing a large spider’s web on a sheet of A4 paper. Lay a clear plastic page protector over your paper and use our glitter glue to carefully trace the web onto the plastic, ensuring the lines of your web are wide and sturdy. The glue will need to dry overnight but once dried, carefully peel away your web and decorate your windows! Your home will look like it's been overrun by glittery creepy crawlies!
We hope these ideas have helped to inspire your own Halloween craft projects. We always love to see what our customers have been making, so do share with us on our Instagram page! Wishing you happy haunting this Halloween!!
Leave a comment